Loki
之前日志服务用的较多的一般是ELK,EFK,graylog等,但这些日志由java编写,运行需要jdk,而且配置上面,还是有点复杂,比如需要对日志需要写grok将复杂的日志进行匹配,好在后面出了可以根据分隔符的方式进行日志的提取,也就是dissect插件,可以根据分隔符进行分割。
ELK在日志方面给我的感觉是大而全,查询匹配是杠杠的,Kibana图表非常丰富。但如果面对大量的数据,需要查询,在不堆机器的情况下,还是会比较疲软,查询比较慢,之前公司每当突发流量的时候,由于日志写入比较大,队列都在kafka,es消费慢,导致无法实时出数据。
最近公众号一直推送关于这个名为Loki的日志服务,感到心痒痒。看了官网,受到了prometheus启发,对日志进行打标签的方式而非全文索引的方式(还未尝试,可能描述不当),而且也可以跟kubernetes集成。
准备开两个档,这次这个打算用简单粗暴的方式来体验下Loki,挖个坑,下次体验和kubernetes结合。
Like Prometheus, but for logs!
安装Loki(使用Local方式)
安装和运行
- https://github.com/grafana/loki/releases/
- 找到要安装的版本,我采用的是v2.1.0
- 下载Loki和Promtail, (Loki为日志的引擎,通过Promtail来发送日志到Loki)
- 在本机找一个目录存放这两个2进制文件
- 下载两者的配置文件(第一个配置文件不适配v2.1.0或者最新的版本,使用https://raw.githubusercontent.com/grafana/loki/af6e8cb6c9a02be44a978c4933fb17778cb401b7/cmd/loki/loki-local-config.yaml替代。 issue-3055)
1
2
wget https://raw.githubusercontent.com/grafana/loki/master/cmd/loki/loki-local-config.yaml
wget https://raw.githubusercontent.com/grafana/loki/master/cmd/promtail/promtail-local-config.yaml - 使用如下命令启动Loki
1
./loki-linux-amd64 -config.file=loki-local-config.yaml
1
2
3
4
root@test:~$cd /usr/local/loki/
root@test:/usr/local/loki$ls
loki-linux-amd64 loki-local-config.yaml promtail-linux-amd64 promtail-local-config.yaml
root@test:/usr/local/loki$./loki-linux-amd64 -config.file=loki-local-config.yaml
尝试搜集nginx日志
- 所以首先对nginx默认的日志进行改造,让他以json的方式进行输出到目录,然后用Promtail对其进行读取。
- 读取使用LogQL的json方式去读取,这个LogQL内容填写在grafana中。
grafana的安装和配置
忽略,可以参考https://grafana.com/grafana/download
配置完数据源即可。
nginx的部分配置改造
虚拟server配置
1 | server { |
promtail_json日志格式配置
1 | log_format promtail_json '{"@timestamp":"$time_iso8601",' |
访问127.0.0.1:8888,观察日志已经正常输出为json格式,请保证该json格式正确。
1 | root@test:/etc/nginx/conf.d$tail -f /var/log/nginx/loki_access.log |
nginx日志改造完毕
Promtail配置文件修改
- 因为搜集日志是Promtail处理,所以自然而然是需要根据自己需求来配置Promtail的配置文件。
1 | server: |
LogQL json部分文档理解
- json的提取分为两种方式,带参数和不带参数
不带参数的方式
- 使用
|json来提取日志的json内容,前提是json内容为有效json格式。 - 嵌套的字段会用”_”将内外层的key进行拼接。
- 忽略数组。
看一下官网中不带参数方式的样例
1 | { |
被json解后,得到如下:
1 | "protocol" => "HTTP/2.0" |
从输出能看到,原本request字段内容为嵌套,所以request里面的内容的key验证了如上第二点,使用”_”进行了拼接。
同时servers由于是个数组,所以在解析后直接丢弃了servers这个key,验证了第三点。
带参数的方式
- 带参数的方式,json只会根据参数来解开需要的部分(当单条json数据比较大的时候应该能省很多资源)。
- 使用| json label=”expression”, another=”expression”的方式来编写该方法。可以存在多个参数
看一下官网中带参数方式的样例
使用| json first_server=”servers[0]”, ua=”request.headers["User-Agent"]进行提取
1 | { |
输出结果为:
1 | "first_server" => "129.0.1.1" |
first_server和ua都为原先参数中指定的key
如果要提取整个对象,可以使用| json server_list=”servers”, headers=”request.headers
这样就能得到如下输出:
1 | "server_list" => `["129.0.1.1","10.2.1.3"]` |
尝试写一条LogQL表达式
一条完整的LogQL表达式由两部分构成:
- a log stream selector,可以理解为,通过设定的label去匹配要抓取哪些日志。
- a log pipeline,可以理解为表达式。比如json的提取。
比如如下表达式
1 | {container="query-frontend",namespace="tempo-dev"} |= "metrics.go" | logfmt | duration > 10s and throughput_mb < 500 |
{container=”query-frontend”,namespace=”tempo-dev”} 部分为log stream selector,后面部分为log pipeline。
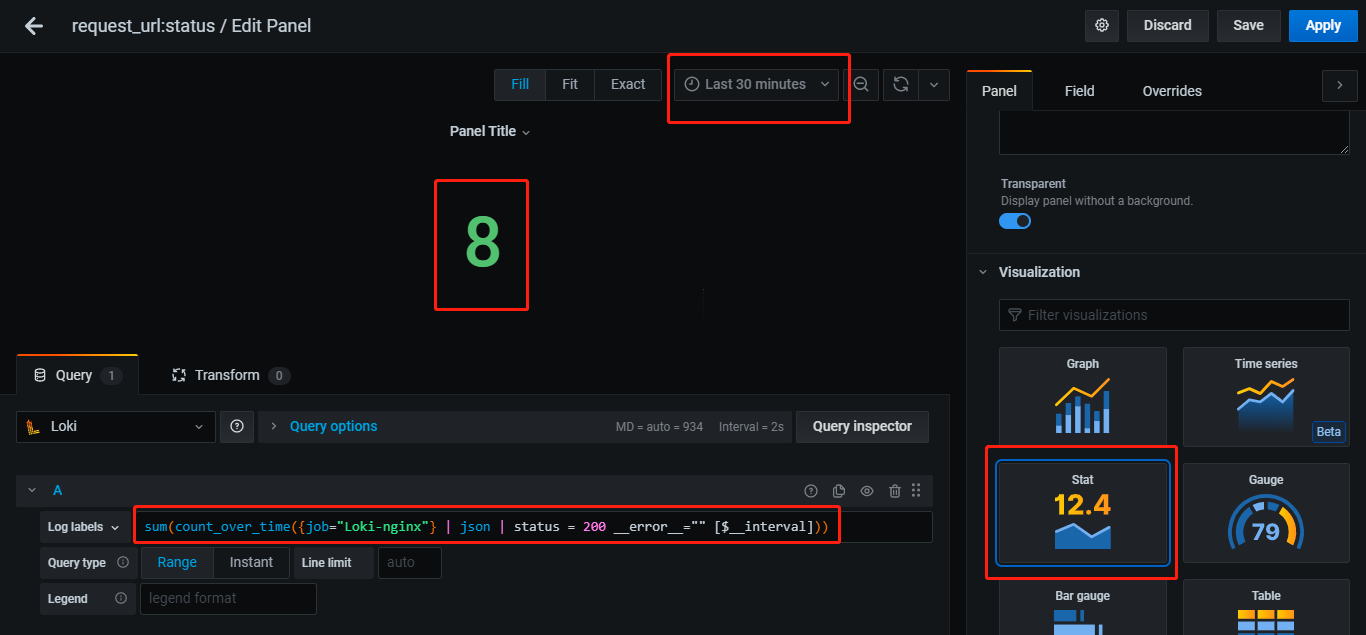
编写一个简单的nginx日志需求
- Loki-nginx日志中状态码为200的条数。
- 根据当前选定时间范围,自动调整。
思考:
- 如何指定Loki-nginx,可以使用log stream selector的表达式来选定。
- nginx日志已经转变为了json,所以可以用
|json来提取。 - 如何获取status字段的信息? |json后面直接跟随|status即可,即
|json|status。 - 如何根据当前选定的时间范围? 使用内置变量
[$\_\_interval]。 - 条数该得用什么方法获得?LogQL有内置函数
count_over_time配合sum,这边需要注意的是count_over_time是根据指定时间范围返回日志条目的具体内容,所以还需要配合sum获得时间段内的总数。
编写:
- 首先选定Loki-nginx的日志,
{job="Loki-nginx"}。 - 使用count_over_time函数配合
[$\_\_interval]来获取总共的条数。count_over_time({job="Loki-nginx"}[$\_\_interval]) - 过滤status字段,让其等于200,表达式
count_over_time({job="Loki-nginx"} | json | status = 200 [$\_\_interval]),此时会报错,因为status为字符串,可以添加__error__=””让其忽略转换出现的异常。得到count_over_time({job="Loki-nginx"} | json | status = 200 \_\_error\_\_="" [$\_\_interval]) - 此时在grafana上显示为多条数据,配合sum得到单独一个数值。
- 最终的表达式为:
sum(count_over_time({job="Loki-nginx"} | json | status = 200 __error__="" [$__interval]))
Grafana图:
refer:
https://grafana.com/docs/loki/latest/clients/promtail/configuration/#configuring-promtail
https://grafana.com/docs/loki/latest/logql/

