原因
之前一直用travis-ci做hexo的发布,但是从两个月之前开始,不知道为什么提交了代码后,travis-ci虽然触发了,但一直卡pending状态,一直不进行构建。导致需要在本机构建hexo,然后推送到master分支,前几篇关于concourse的就是手动构建hexo目录结构进行发布的。
实在不能忍了,前几天阿里云买了台2c4g的机器,准备自己弄个jenkins,做构建发布。
因为之前公司也简单接触过jenkins,不过那会都是页面点点点,这次准备写pipeline进行构建。
我也是才知道,jenkins有个blue ocean的界面,专门用来弄pipeline。而且也是只要将pipeline文件(默认为Jenkinsfile,可以在构建项目的Build Configuration里面修改)放置于仓库根目录,便可以使用Jenkinsfile定义的pipeline进行构建了。我最早那会接触的gitlab和travis-ci也是这么个流程。这样的话就可以在代码仓库直接维护pipeline了。
此次编写的pipeline为Declarative Pipeline
发布流程
发布流程还是参照之前travis-ci编写的流程,只不过这次改成用jenkins去实现了。
- 拉取hexo分支和master分支
- 在hexo分支进行hexo目录构建
- 将master分支的.git目录整个复制到hexo分支下的public目录中
- 将public中的文件强推至master分支,完成发布
其他功能
- 触发式构建
- 邮件通知
具体操作
前期步骤
- 准备插件,总之要用什么就装什么插件,blueocean是必备的,Extended E-mail Notification也得准备,pipeline会用Extended E-mail Notification方式发送。
- 在github准备
Personal access tokens注意权限,用于blueocean对仓库的操作。且在jenkins设置里面配置Github服务器。(网上教程一大把)
- 准备一个邮箱,并设置其能够使用脚本的方式发邮件,比如qq的是开启IMAP独立token。(一开始我用的阿里邮箱,实在没找到在哪里,听说用163的也可以。)由于ECS是阿里云的,所以25端口无法使用,qq的话得走587 smtp端口。
- 根据邮箱信息配置好Extended E-mail Notification里面的内容,
SMTP server,SMTP Port主要是这两部分。
- jenkins设置里面的Jenkins Location,配置好发送邮箱的地址。
- 在github上需要构建的repo仓库中配置好webhook,用于提交后出发回调给jenkins,jenkins webhook地址一般为”jenkins服务器地址/github-webhook”。jenkinsfile的方式自动触发构建是通过github的回调实现,而不是在jenkins页面上配置触发构建。
- 根据blueocean的引导,选择要构建的github项目。
编写Jenkinsfile
- 将需要构建的branch追加该Jenkinsfile
- 内容如下
1
2
3
4
5
6
7
8
9
10
11
12
13
14
15
16
17
18
19
20
21
22
23
24
25
26
27
28
29
30
31
32
33
34
35
36
37
38
39
40
41
42
43
44
45
46
47
48
49
50
51
52
53
54
55
56
57
58
59
60
61
62
63
64
65
66
67
68
69
70
71
72
73
74
75
76
77
78
79
80
81
82
83
84
85
86
87
88
89
90
91
92
93
94
95
96
97
98
99
100
101
102
103
104
105
106
107
108
109
110
111
112
113
114
115
116
117
118
119
120
| pipeline {
agent {
label 'master'
}
stages {
// 并行拉取hexo和master分支
stage('Parellel get repo') {
parallel {
stage('Fetch hexo barnch') {
environment {
NVM_DIR = "/var/lib/jenkins/.nvm"
}
steps {
// 指定工作目录为hexo-branch, 并将hexo分支拉取到hexo-branch目录,如果没有这个目录则创建。
dir('hexo-branch') {
// credentialsId在jenkins配置的credential manager中可以找到,也就是之前配置的Personal access tokens对应的id
git branch: 'hexo', credentialsId: '0cc091e1-b69f-4e1d-b8c6-b7a9df25e438', url: 'https://github.com/huangyisan/myblog.git'
}
}
}
stage('Fetch master branch') {
steps{
dir('master-branch') {
git branch: 'master', credentialsId: '0cc091e1-b69f-4e1d-b8c6-b7a9df25e438', url: 'https://github.com/huangyisan/myblog.git'
}
}
}
}
}
stage('Build hexo') {
steps {
dir('hexo-branch') {
// 因为我用的是nvm管理的node,所以得提前在linux的jenkins用户下安装nvm,这边是引入环境,并且构建hexo
sh '[ -s "$NVM_DIR/nvm.sh" ] && . "$NVM_DIR/nvm.sh" && npm install && hexo clean && hexo g'
}
}
}
stage('cp master .git to hexo-branch/public'){
steps{
// 指定工作目录为master-branch,并且将.git文件cp到hexo-branch下的public中
dir('master-branch') {
sh 'cp -a ./.git ../hexo-branch/public'
}
}
}
stage('set git user info') {
steps {
dir('hexo-branch') {
// 设定提交代码人的信息
sh 'cd ./public && git config user.name "huangyisan" && git config user.email "[email protected]"'
}
}
}
stage ('git add && commit') {
steps {
dir('hexo-branch') {
// Git commit信息
sh 'cd ./public && git add . && git commit -m "Jenkins CI Auto Builder at `date +"%Y-%m-%d %H:%M"`" '
}
}
}
stage ('Push public to Master branch') {
environment {
// 定义了一个变量GH_REF
GH_REF="github.com/huangyisan/myblog.git"
}
steps {
dir('hexo-branch') {
// 从credential manager中获取id为'e5d2d117-b5ab-4dc5-9e07-a5e96bfb6e31'的密钥,赋值给TOKEN
withCredentials([string(credentialsId: 'e5d2d117-b5ab-4dc5-9e07-a5e96bfb6e31', variable: 'TOKEN')]) {
// 进入public目录后,强推master分支
sh 'cd public && git push --force --quiet "https://${TOKEN}@${GH_REF}" master:master'
}
}
}
}
}
// post为构建结束后的操作
post {
// always表示无论构建结构是成功还是失败,亦或其他都执行
always {
dir('hexo-branch') {
script {
// 获取commit id号, 设定邮件的类型,发送方,主题,内容等
def COMMIT_ID = ""
COMMIT_ID = sh(returnStdout: true, script:'git log --pretty=format:"%h" -1')
def mimeType = 'text/html'
def to = '[email protected]'
def subject = '【构建通知】$PROJECT_NAME - ' + "${COMMIT_ID}" + ' - Build # $BUILD_NUMBER - $BUILD_STATUS!'
def body =
'''
<html>
略....
</html>
'''
// 执行发送邮件函数
emailext(
to: to,
subject: subject,
mimeType: mimeType,
body: body
)
}
}
}
}
}
|
提交代码后自动构建
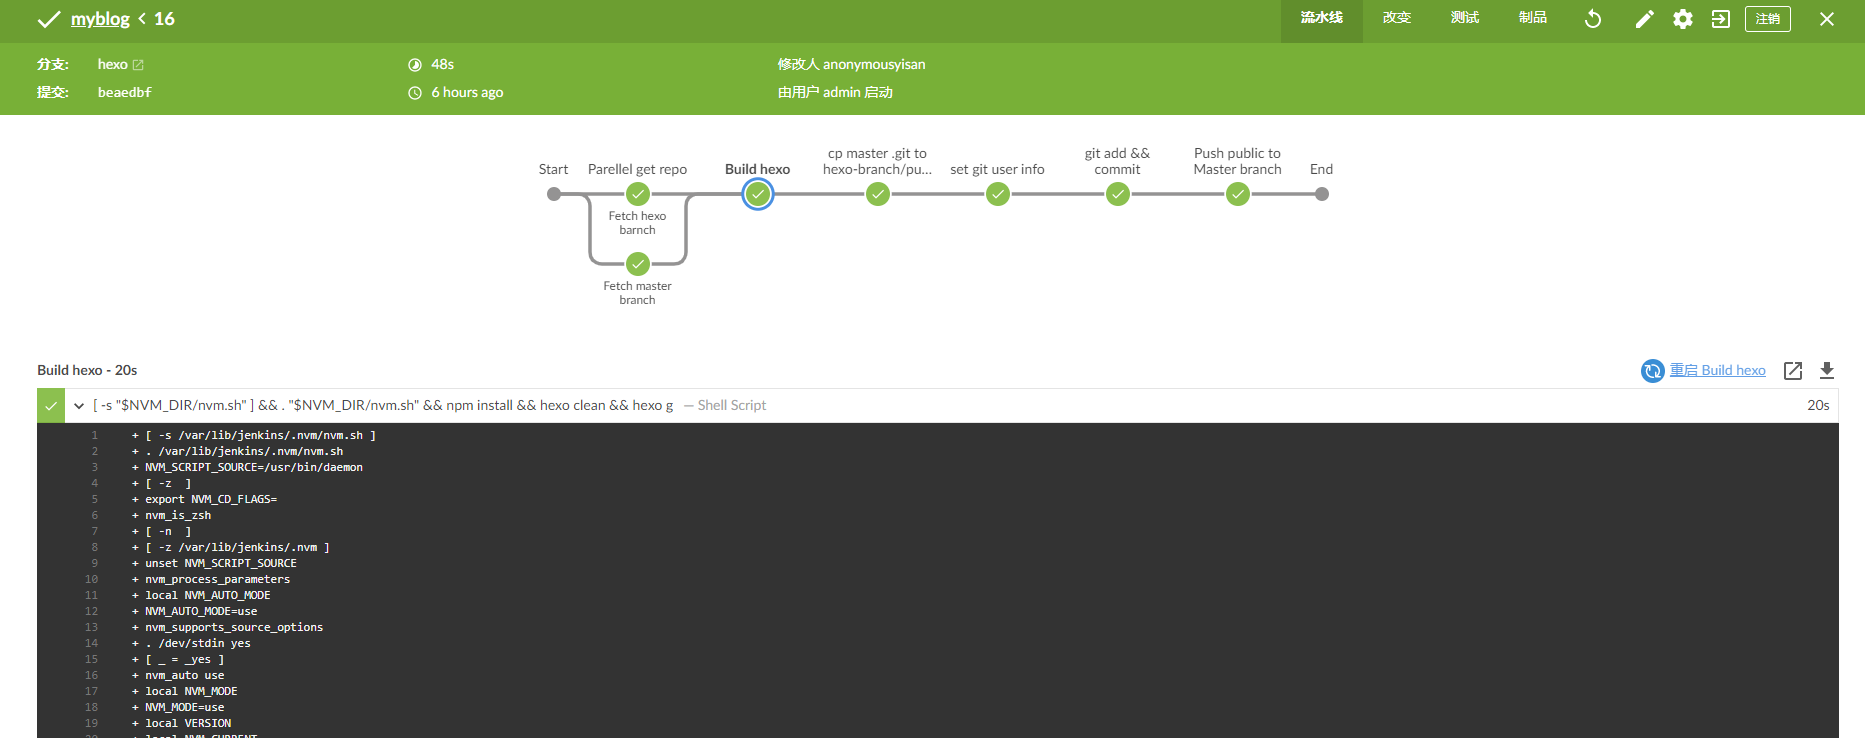
- 可以在blueocean的pipeline中点击查看各个构建步骤的详细信息。
- pipeline构建图如下

验证
- 打开博客页面,看其是否正常显示,且已经有了最新的更新
- 博客地址
iostat.io
本文Jenkinsfile地址: https://github.com/huangyisan/myblog/blob/hexo/Jenkinsfile
refer:
多分支构建参考https://blog.csdn.net/yanggd1987/article/details/106900128/
https://plugins.jenkins.io/github/
https://stackoverflow.com/questions/43912510/send-notification-e-mail-to-upstream-committer-in-jenkins-pipeline
https://www.jenkins.io/doc/book/pipeline/syntax/


